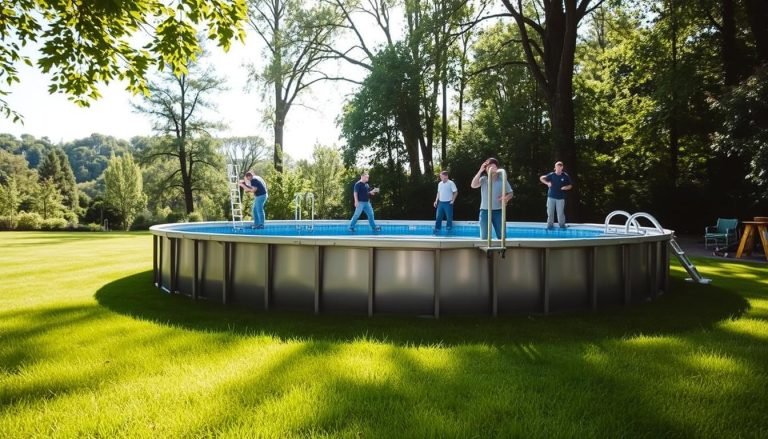
Effortless Above Ground Pool Installation: Complete Step-by-Step Guide
Can a weekend project really turn into a lasting backyard centerpiece? We think so, but it takes planning and a clear workflow to get there.
We set the stage with simple, practical information on tools, time, and steps. Most first-time builders finish in about 6–10 hours when they measure, level, and follow a steady sequence.
Our guide follows a proven pro method: a 3-inch bed of fine sand, a pre-cut liner pad, wall foam fixed with adhesive, and a foam or sand cove to support the liner seam. Keeping no air space under the liner prevents blowouts and wall pull-downs.
We also explain when to consult an above ground pool installation expert so the base height and liner support match your kit. Read on to learn the exact step order, tool checklist, and a few small tips that make the work faster and more durable.
What to Expect: Time, Tools, and How This Guide Works
Smart financial planning transforms your backyard vision into reality. We help families create accurate budgets that cover all aspects of their project.
Proper above ground pool installation cost analysis prevents surprises and ensures your outdoor living space meets expectations. Let’s explore the key financial considerations.
We plan the project so you can reserve enough daylight, helpers, and supplies. Expect about 6–10 hours for full assembly when the yard is prepped and you have at least one helper. The estimated time varies with yard prep, crew size, and model size.
Pool Installation time and skill level
Most DIYers with basic measuring and fastening skills can follow this guide to install ground pool systems effectively. If you can use a level and tighten fasteners to spec, you’re ready. For heavy lifting—like the steel wall roll—bring extra hands.Most DIYers with basic measuring and fastening skills can follow this guide. If you can use a level and tighten fasteners to spec, you are ready. For heavy lifting—like the steel wall roll—bring extra hands.
Essential tools and materials checklist
Have these on hand to avoid mid-project runs: shovel, rake, level, tape measure, roller/tamper, wrenches, screwdrivers, duct tape, and fine sand. Also stage the liner floor pad, wall foam, and foam cove before you begin your project to install ground pool equipment properly.Have these on hand to avoid mid-project runs: shovel, rake, level, tape measure, roller/tamper, wrenches, screwdrivers, duct tape, and fine sand. Also stage the liner floor pad, wall foam, and foam cove before you begin.
Following manufacturer instructions for your specific kit
We align our steps from our suppliers and follow the fastener counts, torque, and safety notes exactly. Those details protect the wall, liner, and your warranty.
Item | Why it matters | When to have ready |
Fine sand | Creates a smooth, supportive base | Before leveling |
Wall foam & liner pad | Protects liner and hides seams | At assembly start |
Tools kit (wrenches, level) | Speeds assembly and ensures accuracy | From day one |

Plan First: Permits, Placement, and Ground Pool Size Selection
Before buying, we review local rules and map the best spot to avoid surprises.
Many U.S. jurisdictions require permits when a model exceeds certain diameters or depths. We check city, county, and state codes early so permits, barriers, and alarms are sorted before purchase.
Confirm local permits and safety codes in the United States
Start by calling your building department or visiting their website. Ask about required fencing, setbacks, and electrical clearances to keep the project legal and safe.
Choosing the right size and kit for your yard and budget
Match sizes to usable yard area and your maintenance plan. Buying a kit at a trusted shop reduces guesswork and often includes a warranty and compatible parts.
Safe distances from pool wall, fence, tree, and utilities
We recommend during installation in keeping about 5 ft from exterior walls or fences and 8–10 ft from trees. Avoid placing the unit under overhead lines and mark underground utilities before digging. Also, make sure the swimming pool base area is level and clear of debris to ensure proper installation and long-term stability.
Common Size | Best Yard Area | Experience |
12–15 ft | Small backyards, tight grass areas | Wading, kids |
18–24 ft | Medium yards with equipment access | Family recreation |
27–33 ft | Large areas; leaves space for deck | Swimming pool feel, deeper water |
Site Preparation: Marking, Clearing Grass, and Leveling the Area
Marking a clear center and outline makes excavation and leveling far easier. First, use a string and stake to mark the footprint and true center. For round models, snap a circle; for rectangles, confirm diagonals match to find the center point.
Marking the footprint and center point
We stake the center, run a taut string to the edge, and mark the outline. This step guides every later cut and ensures the wall and liner align with the base.
Removing sod and organic material
Remove all grass, roots, and organic soil. Leaving sod under the base leads to settling that can damage the liner and stress the wall.
Leveling and compacting to within one inch
We rake the surface, remove stones and roots, and lower high spots instead of filling low ones with loose soil. Then we compact with a roller or tamper until the floor is within one inch across the area.
Task | Why it matters | Tool |
Mark footprint & center | Ensures true alignment of wall and liner | String, stakes, tape measure |
Remove sod/organic | Prevents settling and liner damage | Shovel, sod cutter, rake |
Level & compact | Creates stable, even base within 1 inch | Long level, roller/tamper |
Debris removal | Avoids punctures and pressure points | Rake, gloves, wheelbarrow |
Building a Proper Base: Sand Bed, Floor Pad, and Ground Pool Cove
A solid base starts with consistent sand depth and careful checking—this step sets the liner up for long life.
We spread fine, debris-free sand to a uniform 3-inch bed wall-to-wall and compact it lightly. The rule is simple: no air space between the sand and the liner. Any void can allow movement that stresses the liner and pulls on the wall.
Next we lay a pre-cut liner floor pad, such as an Armor Shield-style geotextile, over the sand. The pad protects the bottom pool ground pool material from rocks, roots, and glass and gives a smooth feel underfoot.
We attach 1/8″ closed-cell foam to the metal wall with spray adhesive or tape, then form a continuous foam or sand cove. A foam cove about 3-3/4″ high on top of the 3″ sand gives roughly 7″ of seam relief. That height reduces seam stress and supports the wall edge reliably.
Model | Sand cove (yds) | Foam cove (yds) |
24′ round | 3.5 | 2.5 |
18′ round | 2.0 | 1.5 |
12′ round | 1.0 | 0.75 |
15’×30′ oval | 3.5 | 2.5 |
Before moving on, we re-check smoothness and the gentle slope into the cove so the ground pool liner rests continuously with no gaps.
Assembling the Bottom Track and Base Components
We begin by laying out the bottom track components so the base will register true to your kit’s footprint.
We lay plates, stabilizers, and rails on the compacted sand to form the bottom ring or rectangle exactly as the manual shows.
Measure diameter or length across several axes to verify the size and roundness before staking the track. If measurements vary, loosen sections and adjust until the span is consistent.
Leveling plates and setting supports
Stake the track to prevent shifting during wall placement. Confirm each plate sits flat and level with the compacted area beneath it.
Set support stones or clips to the kit’s specified elevation so each support transfers load into the base. Remove stray sand or debris that lifts plates and re-check level after adjustments.
Component | Purpose | Check | Action |
Bottom plates | Seat wall and distribute load | Flat, level | Adjust or re-bed on compacted sand |
Stabilizer rails | Keep rim straight | Gap tolerances per manual | Align and tighten connectors |
Support stones/clips | Local load transfer | Elevation matches spec | Embed or shim as needed |
Stakes | Prevent track movement | Secure at intervals | Drive firmly and retest measurements |
Finally, confirm the center point aligns with the track to simplify later cutouts for equipment. With the bottom track true and stable, the next step is positioning the wall.
Pool Installation Wall Setup: Positioning, Fastening, and Protection
Precise wall work sets the tone for a safe, long-lasting build. We position the steel ring so the bottom edge nests in the track and the top ground pool wall sits level. Stakes or clamps hold the sheet steady while we unroll to avoid kinks or tipping.
Unrolling and aligning cutouts
We unroll the metal slowly and align skimmer and return cutouts to the planned equipment side before any bolts go in. Taking time now prevents awkward re-drilling and keeps the liner fit tidy.
Fastening seams and protecting hardware
We secure the seam with every nut and bolt the manufacturer supplied, following the torque pattern. Skipping fasteners risks movement and leaks, so we tighten in stages to seat the joint evenly.
Where the liner will touch heads, we wrap bolt faces with multiple tape layers or protective caps to stop abrasion during use.
Smoothing the inside pool with wall foam
We apply closed-cell foam from the top down, leaving the lower edge exposed for the cove. The foam smooths the inside surface and cushions the liner against metal edges.
Action | Why it matters | Quick check |
Seat wall in track | Prevents gaps under liner | Run hand around perimeter |
Cover bolt heads | Protects liner | Tape or caps installed |
Apply wall foam | Smooths inside surface | Foam continuous, no gaps |
Above Ground Pool Installation: Liner Types and Fitment
Choosing the right liner type early saves time and avoids fit problems on assembly day.
V-bead, J-bead, Unibead, and overlap options
We compare common bead styles so you can pick the liner that matches your track. V-bead and J-bead hang directly into matching rails with no clips.
Unibead gives conversion flexibility; overlap liners drape over the top and lock with plastic strips.
Warming, hanging, and smoothing without wrinkles
Warm the material in sunlight to improve flexibility. Then center the sheet and hang it evenly to reduce tension.
Work wrinkles outward from the center toward the wall while avoiding shoes inside the ground pool. Stabilize the top rail once alignment is correct.
Full support and no air space
We always make sure the liner rests fully on the sand and pad. Any air space beneath the sheet can cause blowouts and early wear.
Type | How it hangs | Best use |
V-bead | Seats into V-rail | Simple, secure fit |
J-bead | Hooks into J-rail | Low-profile edge |
Overlap / Unibead | Overlap clips or convertible bead | Flexible for many kits |
Top Structure: Stabilizer Rails, Upright Posts, and Top Covers
We finish the shell by adding the upper frame that turns the wall into a standing, load-bearing ring.
Next we secure the ring with stabilizer rails so the wall can stand on its own while we add the upper framing. We fit each stabilizer rail per the kit to lock the sheet metal in alignment. This step lets the structure free-stand safely while we work above it.
Setting uprights, top plates, and rails
We set upright posts and top plates around the circumference, checking plumb and level as we go. Install top rails continuously before final tightening so gaps stay even and the ring remains true.
Fasteners, covers, and final checks
We make sure all fasteners are present and tightened to spec during the installation. Add top covers and decorative caps to protect the top pool wall and hardware from weather and wear.
Component | Purpose | Quick check |
Stabilizer rails | Lock wall alignment for safe work | Rail seated, no play |
Upright posts | Transfer load from top rail to base | Plumb within tolerance |
Top covers & caps | Protect hardware and finish edge | Snug fit, no interference |
Finally, we re-check the entire circumference for straightness so the frame shares the load evenly once the ground pool fills. A true ring now speeds the remaining work and reduces surprises during final ground pool installation.
Filling with Water, Working Out Wrinkles, and Final Level Check
A careful, shallow fill lets us work wrinkles out while watching how the structure reacts. Start by adding a thin, ankle-deep layer of water across the floor. This seats the liner and reveals remaining folds so we can smooth them outward by walking gently from center to edge.
Shallow fill to smooth the floor, then continue filling
Keep shoes off the surface and remove any small debris before stepping in. We keep the liner centered and confirm the bead or overlap stays properly engaged as water weight builds.
Monitoring level and wall stability as the ground pool fills
We watch the waterline around the top rails and scan for bulges or shifting in the wall. Pause periodically during the fill to verify the base, cove, and wall alignment remain uniform as the ground pool filled level rises.
Action | Why it matters | Check |
Shallow seat fill | Seats liner and eases wrinkles | Even coverage, no folds |
Slow steady fill | Allows adjustments while adding water | Water rises evenly around rim |
Fastener & wall check | Prevents leaks and pressure points | No loose bolts, no bulges |
Take your time and fill steadily so small corrections are possible. We make sure all fasteners stay tight and that no sharp object can puncture the liner as the final volume of pool water goes in.
Skimmer, Filter, and Return Installation
When the liner has settled but the water remains shallow, it’s time to add the skimmer and return. Make sure your swimming pool parts follow the kit and the manufacturer’s directions so everything aligns and seals sit flat.
Timing, sealing, and hose routing
We fit the skimmer and return around mid-fill so the liner is seated but the water level is low enough for easy access. Use every gasket supplied, align the faceplate, and tighten screws evenly to avoid warping or leaks.
Assemble the filter and pump per the manual, placing them on a stable pad. Confirm flow direction: skimmer → filter → return. Connect flexible hoses fully over barbs and secure clamps snugly without squeezing the hose.
Prime the pump and run a short test. We watch all joints for drips and fix any seepage before finishing the final fill. Also verify electrical connections use a GFCI and meet local code for safe equipment operation.
Component | Action | Quick check |
Skimmer | Seal with gaskets, tighten faceplate evenly | No gaps, no leaks at waterline |
Filter & pump | Assemble on pad, confirm flow direction | Arrows match skimmer flow |
Hoses & clamps | Seat on barb fully, tighten clamps | No pinched hose, clamps snug |
Finishing Touches: Around-Pool Backfill, Safety, and First Swim
A final pass around the perimeter ties together structural stability and user safety.
Fill 6–12 inches of pea gravel or sand around the exterior bottom rail to aid drainage and stabilize the perimeter. This backfill helps water flow away from the base and reduces the chance of washouts after storms.
Startup checklist before the first swim
We install the ladder per the manual and check that steps sit at the correct depth for safe entry and exit. Then we begin water treatment: test pH, alkalinity, and sanitizer and follow product guidelines from the shop or manufacturer for startup doses.
Day-one checks and common pitfalls
Our barriers, alarms, and clearance paths meet local rules before anyone swims. Walk the outside pool line to spot settling and top up backfill where washouts appear.
Task | Why it matters | Quick action |
Perimeter backfill | Improves drainage and stability | 6–12 in pea gravel or sand |
Water chemistry | Protects liner and swimmers | Test & dose per product guide |
Safety checks | Prevents accidents on day one | Install ladder, confirm clearances, set barriers |
We note common mistakes: rushing chemistry, ignoring small leaks, or placing heavy items against the wall. Before the first swimming session, make sure everyone knows the basic rules for the new swimming area
Conclusion
To finish, we list the simple practices that deliver a durable, safe backyard water feature.
We recap the pro method: a level site, a uniform 3″ sand bed, a liner floor pad, continuous wall foam, and a foam or sand cove. These parts work together so the liner sits with no air space and the system resists stress over time. Our customer reviews confirm that following this method consistently results in a smooth, reliable above ground pool installation that lasts.
Plan and follow your kit manual, check dimensions and fasteners, and confirm the wall sits true as you fill. Expect most first-time builds to take 6–10 hours when you proceed in order and use helpers.
Finally, maintain balanced water chemistry and inspect the base and wall during the first days. If we work methodically, we can make sure this project looks and performs like a pro job for seasons to come.
FAQS
What tools and materials do we need before we start?
We recommend a shovel, long level, plate compactor or hand tamper, 3-inch fine sand, a rubber mallet, tape measure, utility knife, cordless drill, socket set, and a liner floor pad. Also include stabilizer rails, uprights, top plates from the pool kit, skimmer and return fittings, and appropriate hoses. Check the manufacturer parts list for your specific kit so we have every fastener and gasket on hand.
How long will a typical DIY pool take to complete?
An above ground pool installation team can usually finish site prep and wall setup in one to three days; liner fitting, plumbing, and final fill often take another day or two. Time depends on size, ground condition, crew experience, and weather. We plan for extra time if we must remove deep roots, add base material, or wait on inspections.
Do we need permits or inspections?
Yes — many U.S. municipalities require permits and fencing or barrier inspections for safety. We contact local building departments to confirm setback limits, electrical rules, and any pool-safety ordinances before buying the kit or starting work.
How do we choose the right kit and size for our yard?
Measure the available flat area, account for required clearances from buildings and utilities, and set a budget. Round, oval, and rectangular kits vary in cost and complexity. We match capacity needs, available space, and desired features like integrated steps or a ladder when selecting size and model.
What is the best surface to set the pool on? Can we put it on grass?
For our above ground pool installation, we remove sod and organic material for a stable, inert base — grass alone will compress and rot. A compacted sand bed or crushed stone with a protective floor pad works best. This prevents liner abrasion and provides even support for the bottom and walls.
How do we level the site to meet the one-inch tolerance?
We establish a center point and grade from that reference, using batter boards or laser/long level to check elevations. Remove high spots and add sand to low areas, compacting in thin lifts until the entire footprint is within one inch of level.
How much sand will we need for a 15-foot round or a 16x32 rectangular kit?
Sand needs vary by kit and cove depth. As a rule of thumb, plan for about 1–2 tons of sand for small round kits and 3–6 tons for larger rectangular pools, plus extra for the cove and to correct small grade errors. We always confirm quantities with the manufacturer guidance for our exact model.
What is a pool cove and why do we need it?
The cove is a rounded sand or foam ridge placed at the wall base inside the liner seam. It supports the liner where it meets the wall, prevents wrinkles, and keeps the bottom seam from being walked on. We form a smooth, continuous cove before inserting the liner for reliable support.
Which liner bead types should we choose: V-bead, J-bead, Unibead, or overlap?
Choice depends on the top track design in our kit. J-bead and Unibead lock into top rails for a secure fit, V-bead and overlap have different retention methods. We match liner type to the top rail specified by the manufacturer and follow their hanging procedure for correct fit and warranty compliance.
How do we warm and hang the liner to avoid wrinkles?
We warm the liner in the sun or a warm room to increase flexibility, then loosely position and anchor the bead into the track. As water fills, we work out wrinkles from the center toward the wall, keeping the liner supported so no air gap forms between liner and base.