How To Remove Efflorescence From Masonry
Have you ever wondered why that stubborn white powder keeps coming back on your beautiful brick walls, concrete surfaces, or other masonry materials, no matter how much you scrub?
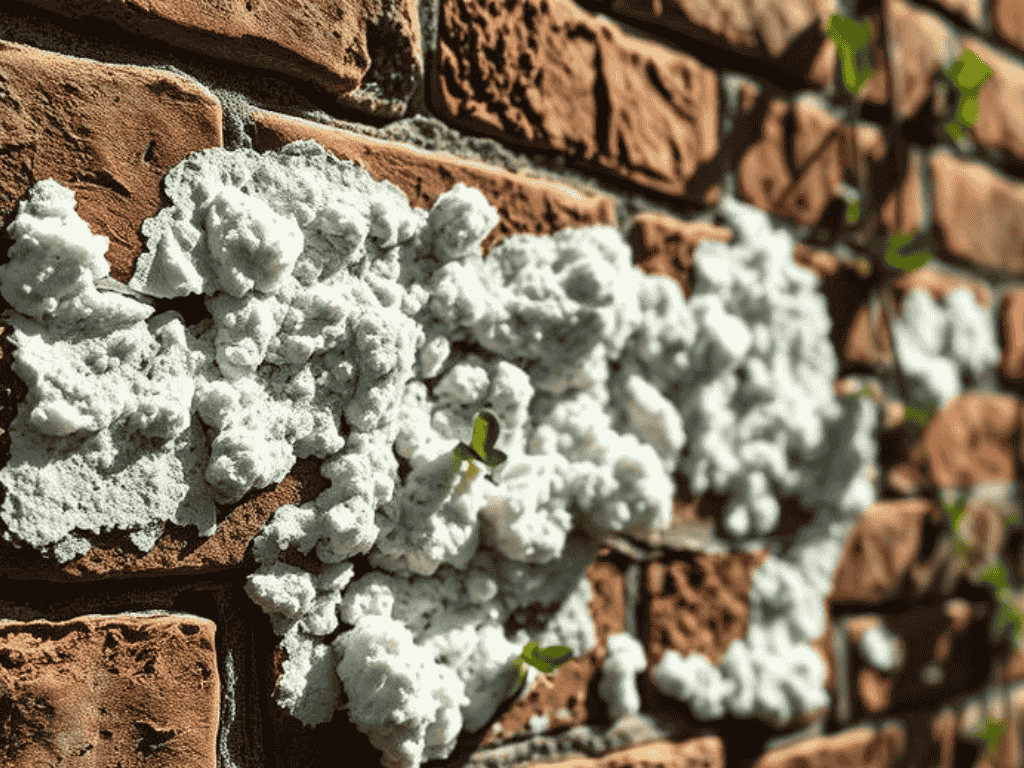
Efflorescence is a common issue that affects many structures. It appears as a white, powdery deposit. This deposit can ruin the look of stone, brick, and concrete surfaces.
Understanding what causes this problem is key to fixing it. Moisture moves through the material. It brings soluble salts to the surface. These salts dry and leave a white stain.
This guide offers clear steps to remove efflorescence safely. It covers both DIY techniques and when to call a pro. You will learn how to restore your building’s appeal and ensure its longevity.
Key Takeaways
- Efflorescence is a white, powdery deposit caused by moisture moving through masonry and leaving salts behind.
- Effective removal involves both mechanical methods like brushing and chemical cleaners tailored to the material.
- Identifying the root cause of moisture is crucial to prevent efflorescence from returning.
- Safety gear, such as gloves and goggles, is essential when handling cleaning solutions.
- Applying a quality sealant after cleaning can help protect surfaces and reduce future issues.
- Severe or recurring cases may require professional assessment to address underlying structural problems.
Understanding Masonry and Efflorescence
Many homeowners admire the timeless beauty of stone and brick structures. They appreciate the classic look these materials provide. Yet few understand the building techniques behind them.
This knowledge becomes crucial when white powdery deposits appear. Knowing the construction methods helps address these issues properly.
What is Masonry Construction?
Masonry involves building structures from individual units. These units are bound together with mortar. The craft creates durable walls and buildings.
Common materials include brick, stone, and concrete blocks. Each material offers unique benefits for different designs. The choice depends on local availability and desired appeal.
Proper construction ensures strength and longevity. Skilled workers use specific techniques for stability. The right mortar mix is essential for durability.
Different masonry types serve various purposes. Brick offers consistent patterns and colors. Stone provides natural beauty with unique shapes.
Concrete blocks deliver strength for larger structures. Each material requires proper maintenance over time.
| Material Type | Primary Uses | Key Characteristics |
|---|---|---|
| Brick | Walls, pathways, facades | Uniform shape, variety of colors, good thermal mass |
| Stone | Foundations, walls, decorative elements | Natural appearance, high durability, weight-bearing capacity |
| Concrete Blocks | Structural walls, foundations, retaining walls | Large size, high strength, cost-effective for big projects |
Defining the Problem: What is Efflorescence?
Efflorescence appears as a white, powdery deposit on surfaces. It forms when water moves through masonry material. This water carries soluble salts to the surface.
As the water evaporates, it leaves salt crystals behind. These crystals create the visible white stain. The issue often indicates excess moisture problems.
This condition doesn’t always mean structural damage. However, it can affect the visual appeal of walls. It may signal water issues that could cause future damage.
Different materials experience efflorescence differently. Porous stones might show more deposit. Dense concrete may show less visible residue.
Environmental conditions influence its formation. Humid climates see more frequent cases. Temperature changes can accelerate the process.
Understanding this problem helps choose proper removal methods. It also guides preventive measures for long-term protection.
Why Efflorescence Forms on Masonry Surfaces
That white, powdery residue appears when three key elements combine. Water must dissolve soluble salts within building materials. Then moisture carries these salts to the surface where they crystallize.
Several factors contribute to this process. The materials themselves often contain natural salts. Portland cement, mortar, and certain bricks have soluble compounds.
Moisture movement drives the entire process. Water infiltrates through pores and cracks. Poor drainage or leaks accelerate this moisture migration.
Environmental conditions play a crucial role. Temperature fluctuations and freeze-thaw cycles increase moisture penetration. Humid climates and wet seasons see more frequent cases.
Different materials react differently to these conditions:
- Concrete blocks with high salt content show more deposits
- Porous stones display visible residue more easily
- Bricks vary based on their clay composition and firing process
Construction practices influence efflorescence development. Water used during building work can introduce additional salts. Inadequate curing or sealing leaves surfaces vulnerable.
This white powder isn’t immediately harmful to structural strength. However, it signals moisture issues that could cause damage over time. Addressing the water source is essential for permanent solutions.
Seasonal patterns affect efflorescence appearance. It’s more common during rainy periods. Areas with high groundwater levels experience recurring issues.
Understanding these causes helps choose proper removal methods. It also guides preventive measures for long-term protection of beautiful surfaces.
Essential Safety Precautions Before You Begin
Safety must come first when tackling any DIY project. Proper precautions protect both the person and the surface being treated. This approach ensures successful results without unnecessary risks.
Understanding potential hazards helps prevent accidents. Chemical exposure and flying debris pose real dangers. Simple protective measures make all the difference.
Protective Gear for DIY Removal
Wearing the right equipment creates a barrier against harm. Safety goggles shield eyes from dust and splashes. They prevent irritation and more serious eye damage.
Heavy-duty gloves protect hands from chemicals and abrasions. Choose chemical-resistant types for cleaning solutions. Durable work gloves work well for brushing tasks.
A respirator or dust mask filters airborne particles. Fine masonry dust can harm lungs over time. Proper respiratory protection maintains long-term health.
Cover exposed skin with long sleeves and pants. This prevents chemical burns and skin irritation. Sturdy footwear completes the protective ensemble.
Working Safely with Chemicals and Tools
Always work in well-ventilated areas when using cleaners. Open windows or work outdoors when possible. This reduces fume inhalation and improves air quality.
Read product labels carefully before starting. Follow dilution ratios and application instructions exactly. Keep emergency water sources nearby for quick rinsing.
Use power tools according to manufacturer guidelines. Check that electrical equipment is properly grounded. Maintain firm footing and control during operation.
Secure the work area from children and pets. Store chemicals and tools safely after use. This prevents accidents and maintains product effectiveness.
Check weather conditions before beginning outdoor projects. Avoid working in high winds or rain. These conditions affect chemical performance and increase risks.
Keep a first aid kit accessible at all times. Know basic first aid for chemical exposure. Quick response minimizes potential damage to skin and eyes.
Gathering the Right Tools and Materials
Proper preparation separates successful projects from frustrating ones. Having the correct equipment ready makes the cleaning process smoother and more effective. This approach saves time and prevents potential damage to surfaces.

Different materials require specific tools and solutions. Soft stones like limestone need gentle care. Hard surfaces like concrete can handle more aggressive methods.
Mechanical Removal Tools
Physical cleaning starts with the right implements. Stiff-bristle brushes work well for most surfaces. Choose nylon for delicate materials and metal for tougher jobs.
Scrapers help remove loosened deposits efficiently. They come in various sizes for different areas. Always use them carefully to avoid scratching.
Power washers provide thorough cleaning for large surfaces. Adjustable pressure settings prevent erosion. They work particularly well on concrete and brick walls.
Chemical Cleaning Solutions
Chemical options range from mild to strong formulas. Diluted white vinegar works for light efflorescence. It’s eco-friendly and safe for most materials.
Commercial cleaners contain acids for stubborn deposits. These products require careful handling and testing. Always try them on small hidden areas first.
Neutralizing agents like baking soda are essential. They counteract acids after cleaning. This step prevents residual chemical damage.
Additional materials ensure complete preparation. Buckets and sprayers help with solution application. Protective gear maintains safety throughout the work.
Proper storage preserves tool longevity and chemical effectiveness. Follow manufacturer guidelines for best results. Dispose of waste according to local regulations.
Step 1: Dry Brushing the Affected Area
Starting with dry methods prevents moisture from pushing salts deeper into the material. This approach maintains surface integrity while removing visible deposits.
Dry brushing uses mechanical action without water. A stiff-bristle brush works best for this technique. It effectively removes loose, powdery efflorescence from various surfaces.
Begin at the top of the affected area. Use firm circular motions to dislodge the white powder. Work downward to prevent debris from settling on cleaned sections.
Wear protective gear during this process. A dust mask prevents inhalation of fine particles. Safety glasses protect eyes from flying debris.
This method works well for light deposits on brick, stone, or concrete. It helps assess the severity of the efflorescence problem. The results determine if wet cleaning becomes necessary.
For larger surfaces, consider power tools with brush attachments. Use gentle pressure to avoid damaging the material. Softer stones like limestone require extra care.
After brushing, remove the dislodged material completely. Use a broom or vacuum designed for dust collection. This prepares the area for further treatment if needed.
Dry brushing reveals underlying issues sometimes hidden by salt deposits. Look for cracks or mortar deterioration during the process. These problems may require separate repairs.
This technique offers environmental benefits. It uses no chemicals or water resources. The method suits those preferring natural cleaning approaches.
If efflorescence remains after dry brushing, proceed to wet methods. Ensure the surface is completely dry before applying any solutions. This prevents dilution and ensures effectiveness.
Document the cleaning progress with before and after photos. This helps track results and plan future maintenance. Regular dry brushing can manage minor efflorescence between deep cleanings.
Incorporating this step into routine care contributes to surface longevity. It helps maintain the visual appeal of various structures over time.
Step 2: Applying a Cleaning Solution
Selecting the appropriate cleaning solution depends on the severity of efflorescence. Different materials and salt levels require specific chemical approaches. This step breaks down salt crystals for easier removal.
Using a Diluted Vinegar Solution
Mild efflorescence often responds well to natural acids. A simple vinegar solution works effectively for light deposits. Mix equal parts white vinegar and water in a spray bottle.
Apply the mixture evenly across the affected area. Let it sit for 5-10 minutes to dissolve salts. The acid content breaks down crystalline structures gently.
This method suits various building materials. It works well on brick, stone, and concrete surfaces. The solution is environmentally friendly and readily available.
Considering Commercial Masonry Cleaners
Stubborn cases require stronger chemical solutions. Commercial cleaners contain phosphoric or muriatic acid. These powerful formulas tackle persistent salt deposits.
Always follow manufacturer instructions carefully. Proper dilution ratios prevent surface damage. Use corrosion-resistant sprayers for acid applications.
Apply these solutions in cool, shaded conditions. This slows evaporation and enhances effectiveness. Avoid working in direct sunlight or high temperatures.
Test any chemical on a small hidden area first. Check for color changes or texture issues. This precaution prevents widespread damage to surfaces.
| Solution Type | Best For | Application Time | Safety Considerations |
|---|---|---|---|
| Vinegar Solution | Light efflorescence, delicate stones | 5-10 minutes | Minimal protection needed, eco-friendly |
| Phosphoric Acid Cleaner | Moderate deposits, most surfaces | 10-15 minutes | Gloves, goggles, good ventilation required |
| Muriatic Acid Solution | Severe crystallization, tough materials | 5-10 minutes | Full protective gear, extreme caution needed |
Ensure the surface is completely dry before application. Moisture dilutes chemical effectiveness. This is especially important for acid-based solutions.
Work in manageable sections for better control. Prevent runoff onto plants or other surfaces. Have neutralizing agents ready for post-cleaning.
Choose biodegradable options when possible. These are safer for the environment. They still provide excellent cleaning power for most jobs.
The right solution preserves structural integrity. It maintains the aesthetic appeal of surfaces. Proper application ensures long-lasting results.
Step 3: Scrubbing and Agitating the Surface
Mechanical agitation transforms cleaning solutions into powerful efflorescence removal agents. This step activates the chemical reaction that breaks down salt deposits.
Use a stiff-bristle brush with vigorous circular motions. Focus on areas with heavy buildup while applying moderate pressure. This technique ensures solution penetration without surface damage.
For extensive areas, consider power scrubbers with adjustable settings. These tools increase efficiency for large surfaces. Always maintain control to prevent uneven cleaning.
Work in manageable sections to maintain solution effectiveness. Reapply cleaner as needed to keep surfaces moist. This approach prevents premature drying during the scrubbing process.
Pay special attention to mortar joints where salts accumulate. Use smaller brushes for detailed work in these areas. This preserves joint integrity while removing deposits.
The goal is visible reduction of white powdery residue. Successful agitation prepares surfaces for thorough rinsing. It restores the original appearance of building materials.
| Tool Type | Best Applications | Pressure Level | Special Considerations |
|---|---|---|---|
| Stiff Nylon Brush | Delicate surfaces, historic brick | Moderate pressure | Prevents abrasion on soft materials |
| Power Scrubber | Large concrete walls, extensive areas | Adjustable settings | Requires experience for even results |
| Detail Brushes | Mortar joints, intricate patterns | Light pressure | Preserves joint integrity |
Wear protective gloves and goggles throughout the process. Safety gear prevents chemical splashes and particle exposure. This maintains protection during intensive scrubbing work.
For resistant deposits, extend solution contact time before scrubbing. Stubborn cases might require stronger commercial cleaners. Always test alternative products on inconspicuous areas first.
This mechanical action complements chemical cleaning for complete results. Proper scrubbing ensures efflorescence is fully loosened. It sets the stage for effective rinsing in the next step.
The combination of chemical and physical action addresses even persistent issues. This approach maintains surface integrity while achieving thorough cleaning. It contributes to long-term durability and visual appeal.
Step 4: Thoroughly Rinsing the Masonry
Proper rinsing completes the cleaning process by removing all dissolved salts and chemical residues. This critical step ensures the surface returns to its original condition without leftover contaminants.
Begin with a garden hose or pressure washer on low setting. Start at the top of the cleaned area and work downward systematically. This prevents streaking and avoids redepositing material on cleaned sections.

Use generous amounts of clean water to flush away all residues. Incomplete rinsing can leave behind chemicals that attract dirt or cause discoloration over time. Ensure all cleaning solution is completely washed away.
For acid-based cleaners, apply a neutralizing solution afterward. A simple baking soda and water mixture works effectively. This protects the surface from potential chemical damage.
Direct runoff water away from plants and drainage systems. This prevents environmental contamination from cleaning chemicals. Be especially careful in eco-sensitive areas.
Allow the surface to dry completely after rinsing. Drying time varies based on weather conditions and material porosity. Complete drying reveals whether any efflorescence remains.
Inspect the surface carefully once dry. Look for any missed spots or persistent white deposits. Repeat cleaning and rinsing steps if necessary for complete removal.
Thorough rinsing prevents efflorescence from returning quickly. Leftover salts or chemicals can recrystallize upon drying. Proper water flushing ensures long-lasting results.
This step prepares surfaces for optional sealing treatments. A clean, residue-free surface allows sealants to bond properly. This enhances durability and protects against future moisture issues.
Effective rinsing contributes to the overall maintenance of beautiful structures. It preserves the visual appeal of brick, stone, and concrete surfaces. Proper technique ensures cleaning work lasts for years.
Addressing Persistent or Severe Efflorescence
Some salt deposits resist standard cleaning methods despite thorough efforts. These stubborn cases require advanced approaches and deeper investigation. Persistent efflorescence often indicates underlying moisture problems needing comprehensive solutions.
Specialized poultices effectively draw out deep-seated salts from building materials. These mixtures combine absorbent substances with cleaning solutions. Common ingredients include clay or diatomaceous earth for maximum extraction.
Repeated treatments become necessary for severe crystallization cases. Allow complete drying between applications to assess progress. This prevents over-wetting that could worsen moisture issues in the structure.
Investigation of underlying causes is crucial for permanent resolution. Common problems include:
- Hidden leaks in walls or foundations
- Poor drainage around the building
- High groundwater levels introducing constant moisture
- Salt-laden construction materials
Special desalination products help extract salts from within porous materials. These specialized formulations follow specific application guidelines. They require proper safety measures during use.
Cracking or spalling alongside efflorescence signals potential structural damage. These conditions warrant professional evaluation to assess underlying issues. Experts can determine if repairs are needed beyond surface cleaning.
Environmental factors significantly impact persistent cases. Properties near saltwater or using deicing salts experience exacerbated problems. Barrier implementation or alternative materials may be necessary for control.
Documentation helps identify patterns in efflorescence recurrence. Record frequency, severity, and weather conditions. This data tailors preventive measures more effectively for specific situations.
Historical structures demand particular care and expertise. Preservation specialists understand appropriate techniques for delicate materials. They prevent damage to historical value while addressing salt issues.
Persistent problems often indicate that DIY approaches are insufficient. Integrated solutions combine thorough cleaning with moisture management. Professional intervention may be necessary for comprehensive resolution.
Addressing severe cases protects against further deterioration. It prevents freeze-thaw damage and maintains structural integrity. Proper treatment preserves the aesthetic appeal and longevity of beautiful surfaces.
Preventing Efflorescence from Returning
Long-term protection from salt crystallization demands strategic planning and proper maintenance. Successful prevention focuses on controlling moisture movement through building materials. This approach addresses the root cause rather than just treating surface symptoms.
Effective strategies combine drainage improvements with protective coatings. These methods work together to create comprehensive defense systems. The goal is to maintain beautiful surfaces while ensuring structural integrity.
Managing Moisture and Improving Drainage
Water management forms the foundation of efflorescence prevention. Proper drainage systems redirect moisture away from vulnerable areas. Gutters and downspouts should channel water at least five feet from foundation walls.
Soil grading around structures should slope away from the building. This simple technique prevents water accumulation near walls. Regular inspection identifies potential moisture issues before they become serious problems.
Addressing leaks and cracks promptly stops water intrusion. Seal openings with appropriate materials designed for specific construction types. This preventive work protects against moisture penetration that carries salts to surfaces.
In high-humidity areas, consider additional ventilation systems. These systems reduce ambient moisture levels around the structure. Vapor barriers provide extra protection in particularly damp conditions.
The Role of Sealants and Waterproofing
Breathable sealants offer excellent protection for various building materials. These products reduce water absorption while allowing vapor transmission. This balance prevents trapped moisture from causing internal damage.
Choose sealants based on material type and environmental conditions. Silane/siloxane formulations work well for brick and concrete surfaces. They provide protection without altering the natural appearance of the material.
Waterproofing membranes offer stronger protection in severe cases. These barriers completely block moisture ingress through walls and foundations. They’re particularly useful in areas with constant water exposure.
Application timing affects sealant effectiveness. Surfaces must be completely clean and dry before treatment. Follow manufacturer guidelines for optimal results and longevity.
Regular maintenance includes resealing every few years. This schedule maintains continuous protection against moisture issues. Consistent care preserves both aesthetic appeal and structural durability.
Using low-alkali cement and washed sand in new construction minimizes salt content. These materials reduce the available salts that can migrate to surfaces. This proactive approach addresses the problem at its source.
Water repellents create protective layers on existing structures. These treatments hinder water penetration while maintaining breathability. They’re particularly effective for historic buildings requiring gentle preservation techniques.
Integrated prevention strategies combine multiple approaches for comprehensive protection. This multi-layered defense system addresses various potential moisture pathways. The result is long-lasting protection against salt crystallization issues.
When to Call a Professional Masonry Contractor
Homeowners often reach a point where professional expertise becomes essential for solving persistent efflorescence problems. While DIY methods work for minor cases, some situations demand specialized skills and equipment.
Contractors bring years of experience in handling complex moisture issues. They understand how water moves through different materials. Their knowledge helps identify hidden problems that cause recurring salt deposits.
Severe structural damage requires immediate professional attention. Cracks in walls or deteriorating mortar indicate deeper issues. These problems go beyond surface cleaning and need proper repairs.
Historical buildings demand special care and preservation techniques. Professionals use methods that maintain historical authenticity. They ensure compatibility with original materials and designs.
Large-scale projects benefit from contractor efficiency and safety measures. Hard-to-reach areas require scaffolding and industrial equipment. Professional crews handle these challenges with proper training.
| Situation | Professional Solution | Benefit |
|---|---|---|
| Recurrent efflorescence | Moisture source identification | Permanent resolution |
| Structural damage | Comprehensive repairs | Restored integrity |
| Historical structures | Preservation techniques | Authenticity maintained |
| Large areas | Industrial equipment | Time efficiency |
| Construction defects | Code-compliant fixes | Long-term durability |
Failed DIY attempts signal the need for professional assessment. Contractors can correct previous mistakes and implement proper solutions. Their work often comes with warranties for peace of mind.
Complex moisture issues like rising damp require technical knowledge. Professionals use specialized tools for accurate diagnosis. They implement effective drainage and waterproofing solutions.
Material compatibility is crucial for lasting results. Contractors select appropriate sealants and repair materials. This ensures proper adhesion and long-term performance.
Building code compliance is another important consideration. Masonry services experts understand local regulations and best practices. Their work meets safety standards and preserves property value.
Investing in professional services saves time and prevents further damage. Contractors address root causes rather than just symptoms. This approach ensures beautiful, durable surfaces for years to come.
Conclusion
The battle against white salt deposits on building surfaces combines science, technique, and regular maintenance. Understanding moisture movement and salt crystallization helps homeowners address this common issue effectively.
Proper safety measures protect both people and surfaces during cleaning. DIY methods work for most cases, but severe problems may need professional assessment.
Preventive strategies like moisture control and sealing reduce recurrence. These approaches preserve structural integrity and visual appeal over time.
Regular inspections catch issues early, minimizing extensive work. This maintenance extends the life and beauty of various construction for masonry materials.
If you’re dealing with persistent salt deposits or want to protect your masonry surfaces, don’t wait—contact trusted masonry companies near me today for expert solutions and long-lasting results.